Guide to Waiheke will cover:
- Top tips for your day trip
- How to get around the island
- 6 must visit wineries and estates – includes wine tasting and food costs
Top Tips For Your Day Trip
- Check the opening hours for each place you want to visit – the 6 wineries I’ve recommended in this guide to Waiheke have reduced their hours due to Covid.
- Take the ferry in the morning (around 9 or 10am) to make the most of your day – I’d say you could get to 3 or 4 spots depending on how long you spend at each place!
- Wear comfortable shoes if you plan on saving some $$ by exploring areas of the island by foot – I know you want to look cute for the ‘gram, but maybe put the heeled boots away for this one.
- Dress in layers – it can get windy and chilly when you’re up in the hills, but you’ll also work up a sweat walking there.
- Double check you have brought your ID if you are drinking.
How To Get Around The Island

Getting there:
Ferry: $21 each way with an AT HOP card, or $46 return when you purchase a ticket at the terminal
On the island:
The cheapest way to go between the wineries is to walk and/or bus. Otherwise there are car and bike rentals, taxis and Ryda (the Waiheke version of Uber).
There are a couple of vineyards within walking distance of the ferry terminal at Matiatia Bay. The walking trail through Te Atawhai Whenua Reserve leads you to Cable Bay, Mudbrick and Jurassic Ridge in 15-20 minutes. My friends and I didn’t quite manage to find the trail, and after wandering around looking for the sign posts – reminiscent of the orienteering course on school camps – we just followed the road. It takes around 40 minutes that way, but it’s an easy walk.
From Mudbrick, walk down toward the main road where you can catch a bus (either 50A or 50B) toward Onetangi; there are plenty more wineries along there. You can use your AT HOP card on the bus, which costs $2, or $3.50 with cash (cash not accepted at time of writing due to Covid, but you can tag on multiple people with your card).
6 Must Visit Wineries And Estates
1. Cable Bay

Wine tasting – $10 for four wines; each variety is introduced and served one at a time at your table. It makes for a longer experience, which is quite nice because you can chat in between each tasting.
Food – includes woodfired pizza ($24-$30) and platters ($38-$45); menu is designed to be shared
2. Mudbrick

Situated at the top of a hill, the sweeping views are absolutely gorgeous up here. It’s an easy 5-10 minute walk away from Cable Bay. Sitting in their tent-like bistro, which has a canvas roof, hardwood beams and is surrounded by lavender bushes, you could easily be somewhere in Europe.

Wine tasting – $11 to $15 depending on whether you want to try lighter, fresher wines (like pinot gris and rosé) or richer varieties (like merlot and syrah).
Food – more casual dining at the Archive Bistro, and more expensive à la carte options at the main restaurant. They also have a plant-based menu! We shared the sourdough with Mudbrick’s own olive oil and brown butter ($12). As well as the octopus ($27), mushroom ravioli ($32) and parmesan and truffle fries ($12). It’s safe to say brown butter is the only thing I want to spread on my bread from here on out.
3. Tantalus Estate

Another wine and beer combo, with Alibi Brewing Co. located on the estate. Tantalus is always highly recommended by those familiar with Waiheke, and rated #1 on Trip Advisor for things to do on Waiheke.
Wine and beer tasting – $10-$15 for five wines, and $10 for four beers.
Food – the adjoining Alibi Brewer’s Lounge does casual food (like sliders, hot dogs, burgers and truffle fries) while the main restaurant does a set three-course menu ($98 per person.
4. Casita Miro

Half way there in my guide to Waiheke wineries. Hopefully energised by the wine and food you have consumed so far, you will need to trek up a steep set of stairs to reach Casita Miro but the view of Onetangi bay is worth it.

Wine tasting – $18 for a flight of five wines; by appointment only.
Food – featuring a tapas style menu, their food is heavily influenced by Spanish cuisine and the wider Mediterranean area. Think paella, tagine, Spanish cured meats, bread and olives.
5. Stonyridge
Wine tasting – $15, or $28 for a premium tasting.
Food – the menu is designed by Nic Watt, executive chef of Masu. Their sharing platter sounds epic for $65; for 2-4 people.
baby mozzarella, homemade condiments, stonyridge olive oil, selection of NZ cheeses,
fig jam, fresh fruit served w fresh breads & rice crackers
6. Wild on Waiheke

This one is perfect for beer and cider lovers, as they are Waiheke’s original craft brewery.
Wine and beer tasting – flight for $20-25.
Food – they have a more casual menu with items like buffalo chicken, burgers and pizza. Don’t get me wrong, I love platters and grazing boards, but by the end of the day I just wanted something a little less… refined?
So there you have it – six winery recommendations to get you started! My guide to Waiheke is definitely inexpensive compared to usual travel plans, so you can afford to splash out a little if you want. My friends and I found the best way to experience all the great food was to get a few dishes to share at each restaurant… plus we walked 17,000 + steps that day! It’s safe to say we worked up an appetite pretty quickly. And if you want a break from wineries, there are plenty of beautiful beaches, walking trails and cafés to visit as well.
Happy travel planning! If you want me to write a guide to other New Zealand places like Queenstown or Dunedin, comment below or hit me up on Instagram at @balanceyourplate. For more local foodie content, check out our article on Favourite Eateries in Auckland.
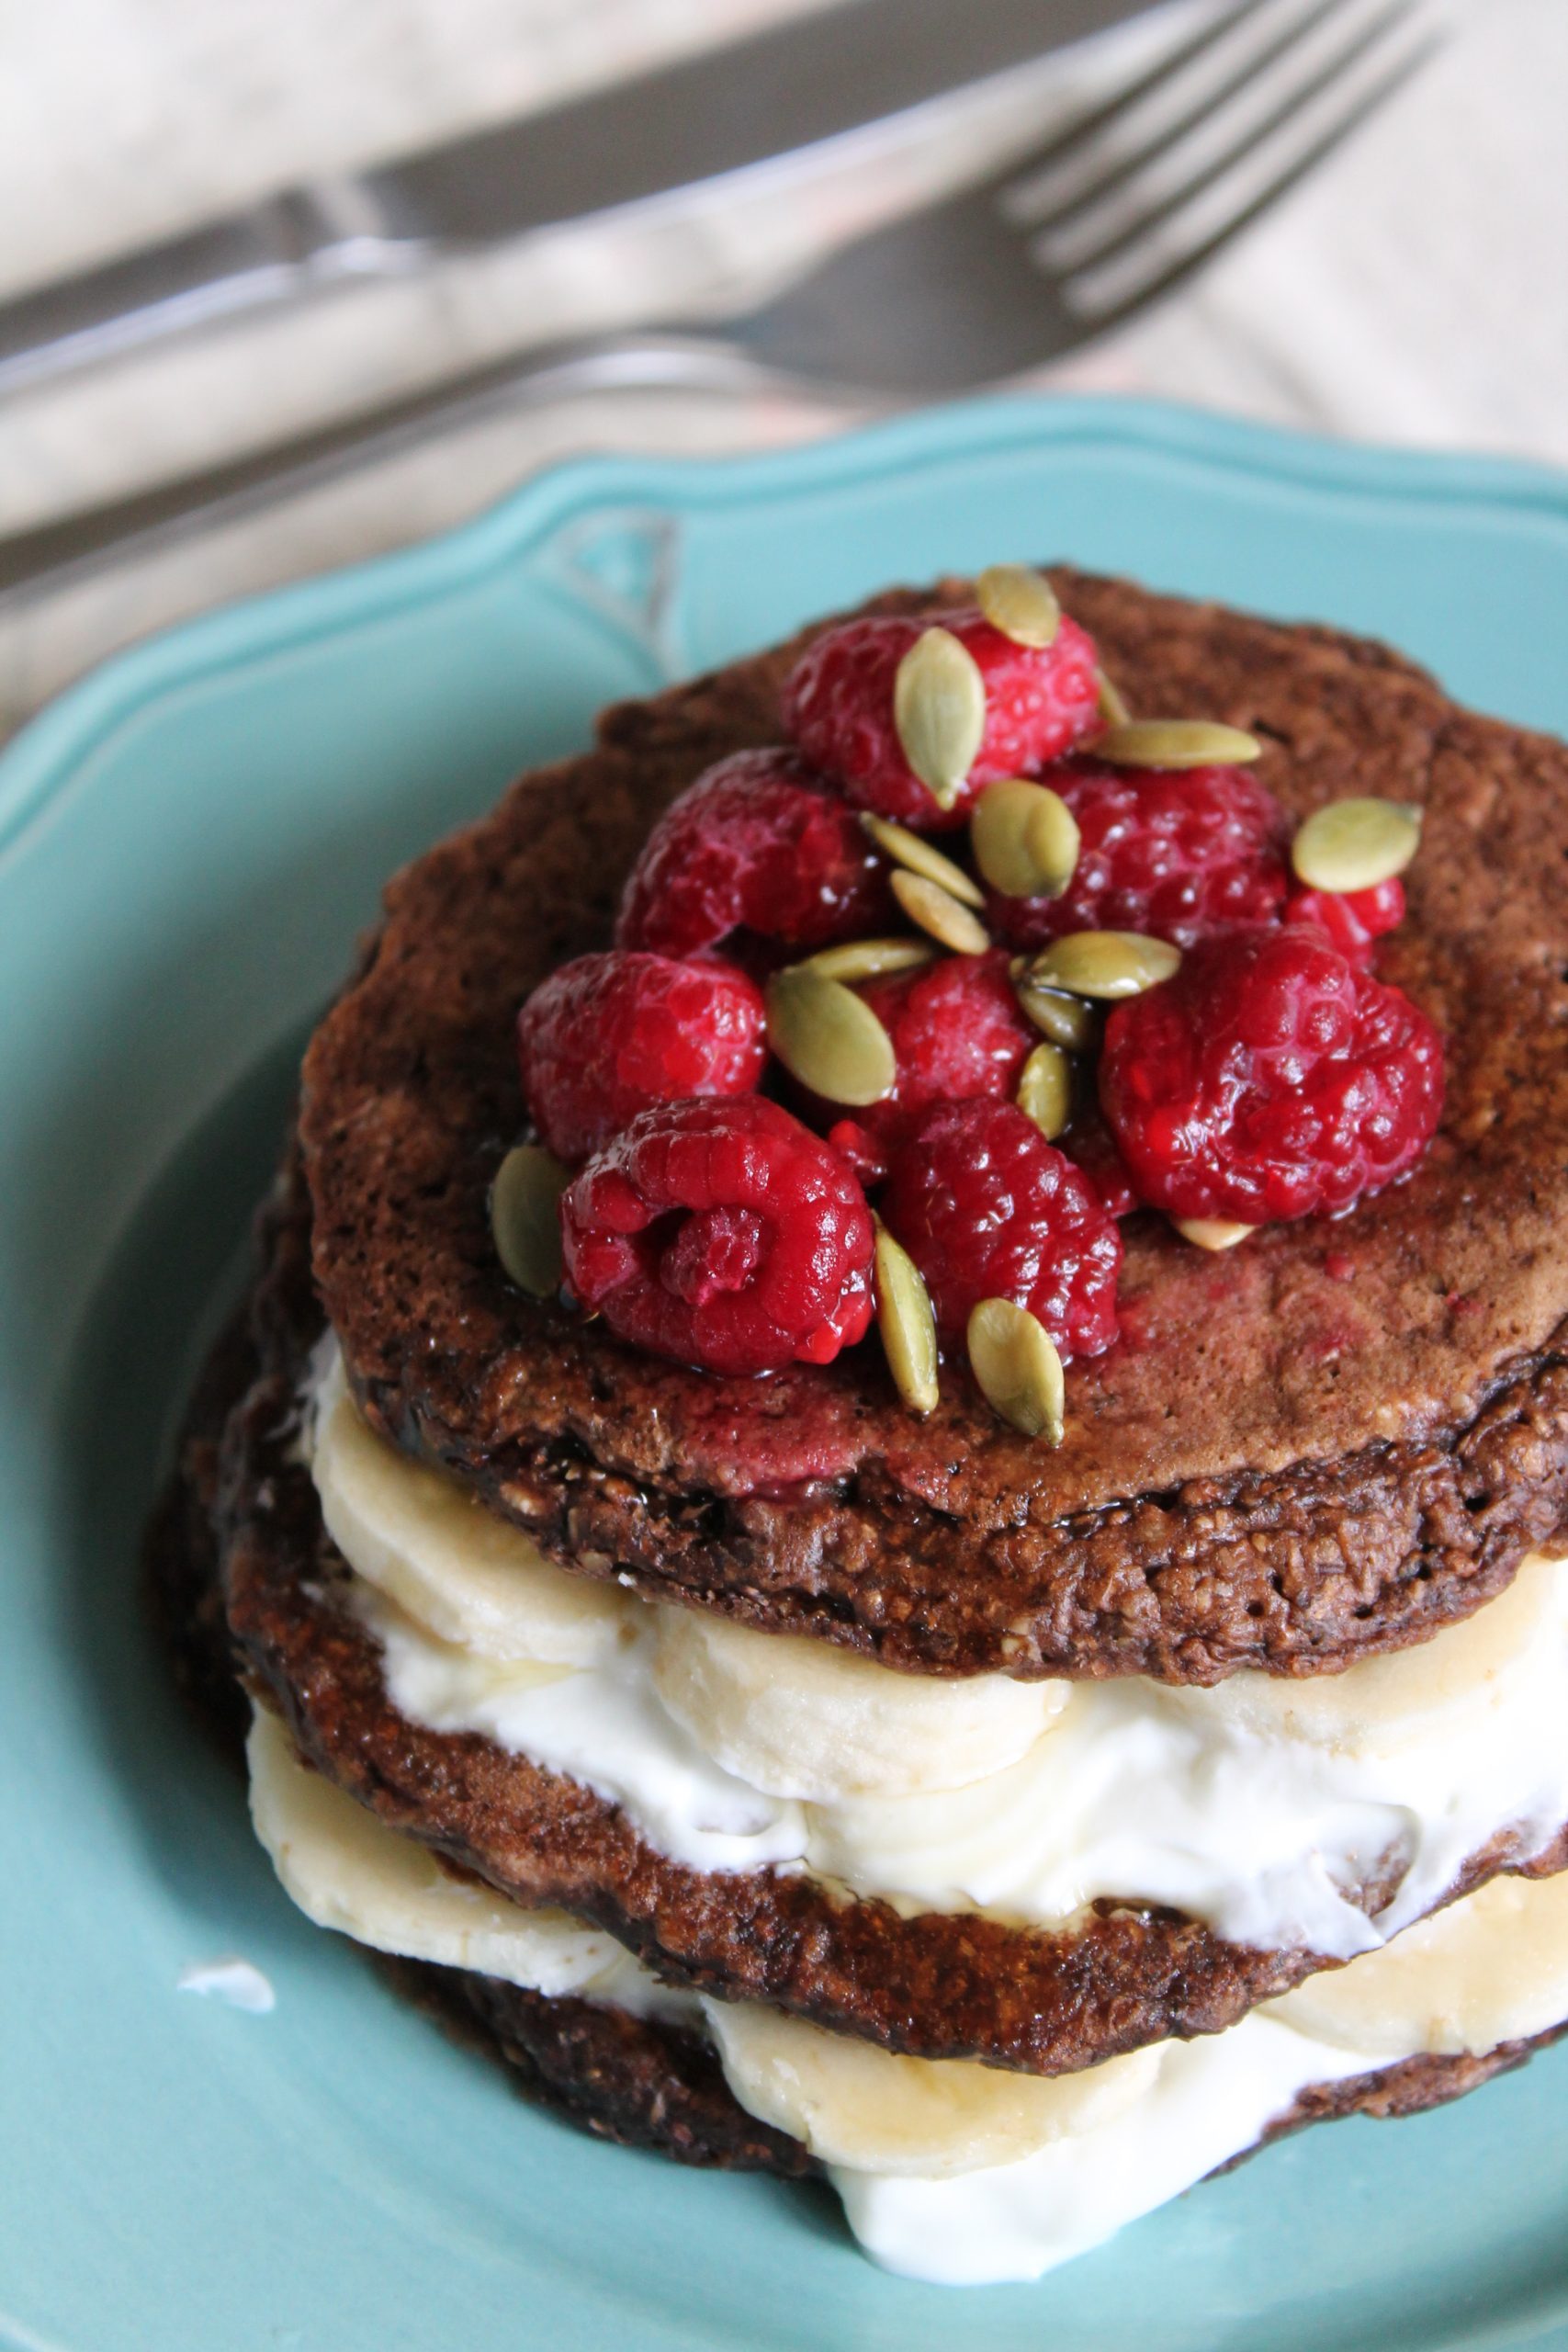
]]>One Bowl Power Pancakes
They say breakfast is the most important meal of the day… and I’d certainly agree if pancakes were in question. Our first easy recipes for exam season are packed with healthy fats and fibres to keep you fuller for longer. Plus you can make these ahead of time and keep a stash in the fridge or freezer for a quick breakfast or snack!
You will need:
- 1 C milk
- 2 tbsp chia seeds
- 2 tbsp ground linseeds (or 1 egg)
- 3/4 C wholemeal flour
- 1/4 C rolled oats
- 1-2 tbsp sugar (depending on how sweet you like it)
- 1/2 tsp baking powder
- 1/2 tsp baking soda
- Generous pinch of salt
- 2 tbsp cocoa powder
Instructions:
- Combine milk, chia and linseeds in a large bowl. Set aside for a few minutes to allow the seeds to absorb some liquid while you gather the other ingredients.
- Add remaining ingredients to the bowl, and mix gently to combine. It will be a little lumpy and that’s fine.
- Heat oil/butter in a non-stick pan, then add a few big spoonfuls of batter and smooth out into a circle with the back of the spoon. Flip when bubbles appear. I made 6 medium sized pancakes.
Crispy Rice Bowl
Arguably the best part of fried rice are the crunchy, golden brown bits stuck to the bottom of the pan (IYKYK). Well this has a whole layer of crispy rice goodness, and you can use up whatever fresh or frozen veges you have already. Top with a runny-yolk egg and you have a nutritious lunch or dinner! There aren’t specific measurements for the recipe – just use the amount of leftover rice you’ll eat and go from there.
You will need:
- Vegetable oil
- Rice (leftover is best)
- Spring onions, sliced
- Soy sauce
- Salt
- Vegetables
- Egg or another protein like tofu, canned tuna etc.
- Sauce: equal amounts gochujang/sriracha, sesame oil, soy sauce; approx. 1 tbsp per serving
- Garnish ideas: pickled red onion, nori seaweed strips, sesame seeds
Instructions:
- Mix rice, spring onions, a dash of soy sauce and a pinch of salt.
- In a non-stick frying pan, heat enough oil to evenly coat the bottom of the pan.
- Once the oil is hot and looks shimmery, press the rice down into one even layer. Reduce the heat to medium, and let it cook for 6-8 minutes. Check on it by lifting up the edges to ensure it is not burning – you want it to slowly turn golden brown and crisp up.
- While the rice cooks, prepare your other vegetables and mix the sauce.
- Transfer the rice to the serving bowl, with most of the crispy layer facing up so that it doesn’t go soggy.
- Using the same pan, fry your egg and/or any vegetables you need to cook.
- Serve with the vegetables, garnishes and a drizzle of the sauce.
60 Second Microwave Cookie
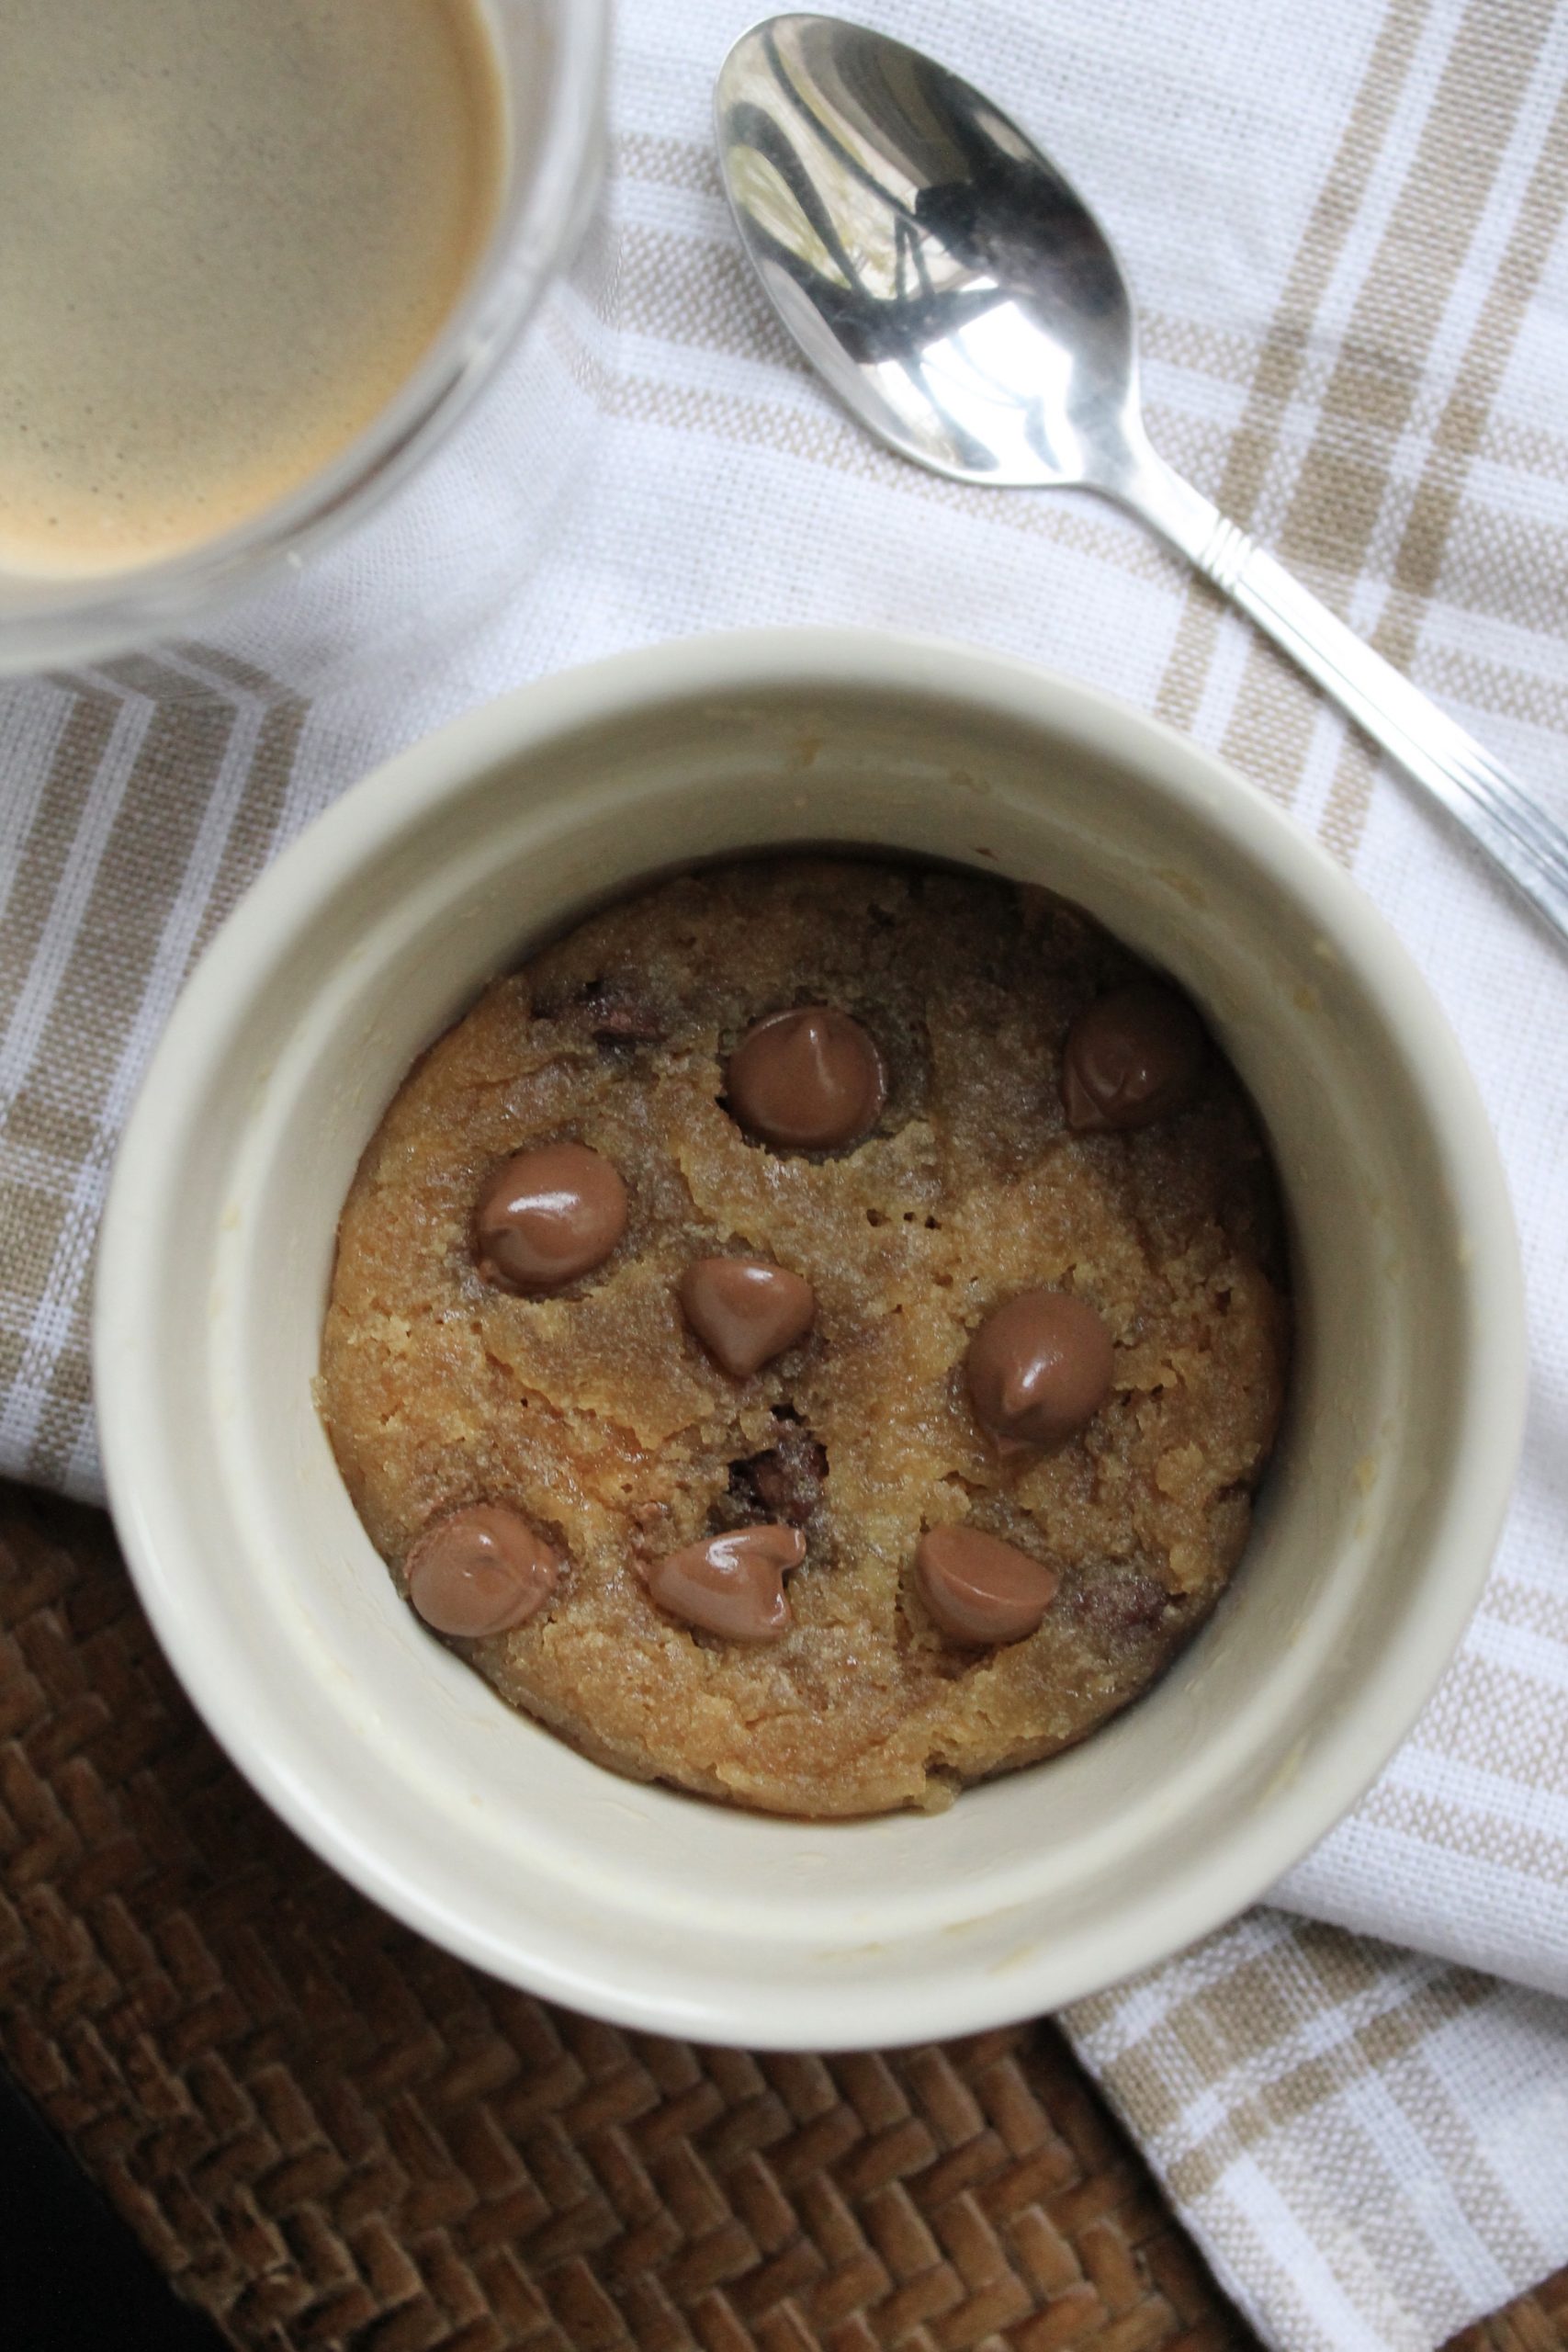

I’m not going to lie, I was sceptical about this idea at first… and as I stared at it spinning around in the microwave, the batter puffed up like a crazy souffle and I prepared myself for the worst. But, after I let it cool down slightly and ate my first spoonful of the “cookie”, I was blown away.
It is gooey on the inside, like eating cookie dough, but also chewy on the bottom where it meets the sides of the dish. Yes, the top will look a little pale and undercooked because you don’t have the full force of the oven to make it the usual golden brown, but appearances aside, it truly hit the spot.
You will need:
- 30g butter or margarine (I used nuttelex)
- 1 tbsp brown sugar
- 1 tbsp white sugar (you could use less if you want it to be a little less sweet)
- ¼ tsp baking soda
- 1/8 tsp salt (aka a pinch)
- ¼ tsp vanilla extract
- 3 tbsp flour
- Handful of chocolate chips (plus a few extra for the top)
Instructions:
- Melt the butter in a microwave safe dish (like a small bowl/ramekin/mug).
- Add the remaining ingredients and mix gently to combine.
- Microwave on high for 45-60 seconds; this depends on your microwave and how wide/deep the dish you are using is. In my 1000W microwave, I did 45 seconds and then another 20 seconds.
- Allow to cool, because this helps the batter set slightly – it is worth the wait I swear.
Comment below which easy recipes for exam season that you are going to try first! I’m already dreaming up different ways I can jazz up the microwave cookie – perhaps a swirl of peanut butter or a scoop of ice-cream on top next?
You can find more easy and delicious recipes on my Instagram @balanceyourplate. For more exam food tips, check out my blog on A+ Foods For C+ Grades.
]]>4 Step Guide to Winter Wellness
1. Getting your 5+ a day during winter
Fresh fruit and vegetables can become more expensive during this time of year, but the vitamins and minerals are as important as ever. It can be tempting to pop a vitamin C tablet and call it a day, but the range of nutrients in fruit and veg is something a supplement will never be able to replicate.
Top tip in our guide to winter wellness is utilising frozen fruit and veg, but also check out what is in season during the next couple of months. We might not want to eat fresh salads as often, but cozy winter soups and roasted root vegetables are still nutritious, easy to make and can be prepped in advance. Take a look at these 3 simple recipes to get started!
The humble potato is a great source of vitamin C? And pumpkin, which is super cheap in winter, is a rich source of Vitamin A.
2. Vitamin D and sun exposure
Second tip for our guide to winter wellness, Vitamin D. In the summer months, most of us are able to get sufficient vitamin D through sun exposure. The Ministry of Health guideline for sun exposure between May and August is a daily walk or activity outdoors in the middle of the day. In the South Island where the UV index is particularly low in winter, you may need to expose larger areas of skin.
And if you have lived in the South Island like me… you’ll know that there is little motivation to take off your puffer jacket and roll up your sleeves.
Aim to get at least 10 minutes of sun every day. It can be hard when it feels like you walk into uni when it’s dark, and leave campus again when the sun has gone down, but a little effort goes a long way. Take a walk during your lunch break with the added bonus of upping your step count for the day, or just drink your coffee outside.
There are small amounts of vitamin D in foods like egg yolks, fatty fish and dairy products. However, the easiest way is to get a little sun. If you think you are at risk for deficiency, talk to your GP about alternatives such as supplements.
3. Regular physical activity
Waking up early to exercise is one thing when the sun is already shining, but the moment daylight savings kicks in and your alarm goes off in what seems like the dead of the night… well there just isn’t anything more comfortable than your bed is there?
Don’t let the weather be an excuse to slack off, and look at how you can adapt instead. If you don’t think you can keep running when it’s cold and dark, see if you can find an alternative activity indoors. Les Mills On Demand has hundreds of workouts which require no equipment, and ClassPass has a bunch of home workout videos available to stream.
If you live in a cold flat, at least you’ll feel warm for a bit without spending a single cent on heating. It’s a win-win. Exercise also boosts your endorphin levels, and can reduce stress and improve sleep – all of which are important to support your immune system.
4. Get your flu vaccination
The vaccine does not eliminate your risk of getting the seasonal flu, but it can still protect yourself and those around you to a certain degree. Find out if your university health centre offers discounted or free vaccines, or make an appointment with your GP or pharmacy. Chemist Warehouse is offering vaccinations for $20 which is slightly cheaper than other pharmacies (at time of writing).
On top of what was mentioned above, other factors like socialising can also have a huge impact on our well being. Food, sleep, exercise, stress and immunity are all linked to one another. It can often feel a bit much trying to juggle all this on top of uni, but if we’ve learnt anything from being in lockdown, it’s that we all need to slow down a little and focus on ourselves a little more.
You got this guys! Comment below what you want me to write about next, and check out my page @balanceyourplate for more health and wellness content.
]]>1. Maintain some sense of routine
Just because you are working from home doesn’t mean you should completely let go of your routine. Having some structure can actually be a source of comfort and predictability when there is so much unknown in our current environment.
Don’t feel the pressure to fill every hour with something productive, but it’s still important to eat and sleep regularly, and move your body in some way (even if it’s just a walk around the block).
2. Write down a list of things to do which you normally “don’t have time” for

Whether it is a movie or series you have been meaning to watch, a new recipe to try or maybe even something kind of boring like deep cleaning your wardrobe. Make the most of this opportunity to do some things you enjoy, without feeling like you are wasting precious time.
Some things on my list include…
- Declutter photos on my camera roll – save important photos to an album to print physical copies of later.
- Journal – this whole experience is something worth documenting.
- Make risotto – recipe says to stand at the stove for 30 minutes stirring and slowly adding ladlefuls of stock to the rice? Yessir, can do.
Helpful online resources include the public library’s range of eBooks if you are wanting to get in some reading or this article full of cooking inspo (including 89 recipes with 5 ingredients or less).
3. Find creative ways to make up for the things you miss

We all know the importance of this lockdown, and our position of privilege to be safely indoors, looking at quarantine memes and having “nothing to do”. But it’s also okay to have selfish thoughts from time-to-time, about missing going out for brunch, the gym, or having to cancel a birthday celebration.
So… why not recreate that at home?
- Have a dinner party over video call – everyone chooses the same recipe to cook, then eat it together (preferably with a glass of wine or two). It’s like Come Dine With Me except if someone messes up the recipe, no one else has to suffer the consequences.
- Join Instagram Live workout sessions – if you’re like me and enjoyed the social, community vibe of classes at the gym, go and find trainers who are hosting live workout classes.
- Recreate your favourite cafe/restaurant meals for your family or flatmates – now is the time to perfect poached eggs, attempt bagels from scratch or make your own sushi rolls. Just be sure to check you have all the ingredients on hand, or make a list for your next supermarket trip.
]]>How many times have you scrolled past those internet-breaking choc chip cookies…
Gooey puddles of chocolate, chewy edges, and perfectly golden brown and crinkly.
You know the ones I’m talking about.
I wanted to compare three popular recipes and see how they fared against one another. I would follow all the recipes exactly; using scales to be accurate and following the video tutorials for technique.

All the cookies were chilled overnight, which allows the flour to rehydrate, leading to less moisture in the dough. Your reward for being patient? Better flavour (more toffee-like), an aesthetically-pleasing golden brown colour and crispier edges.
RECIPE #1 Levain-style “Chocolate Chip Walnut Cookies”

So this batch is a little different to the others. It is chonky. A big boy. None of that chewy, spread out business. They are caramelised on the edges, but the inside is slightly underbaked, soft and gooey.
Overall verdict: these cookies definitely have that wow-factor. Who wouldn’t be impressed by a literal mound of chocolate-y, buttery goodness. The ingredients are simple, and the addition of toasted walnuts works great with the dark chocolate.
Levain Bakery describe themselves as having “New York City’s most famous cookies”. They frequently pop up in travel guides for Manhattan and even back in 2014, before Instagram food accounts were a thing, I knew I had to go to Levain for a cookie. And yes, they were freaking amazing.
Top tips: don’t be scared of making each cookie dough ball big; mine were literally the size of tennis balls. And don’t flatten the dough balls – make sure they are tall mounds with a rough surface in order to achieve the golden, lumpy exterior.
RECIPE #2 Buzzfeed Tasty’s “Best Chewy Chocolate Chip Cookies”
There are over 16,000 ratings for this recipe!!! And they scored 94%, so I had to see if it lived up to the hype.
Overall verdict: you will love these if you like super chewy cookies… as in so chewy they are almost toffee-like, which works well because there is a distinct caramel flavour.
Simple ingredients, simple process (ie. no need to cream the butter) and they taste like the best version of a classic chocolate chip cookie. Also, the crinkles remind me of the wrinkly dog on the toilet paper commercials, how cute.
Top tips: The video showed 6 on a tray, but mine spread a lot and ended up squished against each other, so I would recommend putting 4 to a tray. These cookies are definitely on the sweet side, and some people commented that they add an extra 1/4 cup of flour. This will help balance the sweetness, and also prevent them spreading so thin.
RECIPE #3 Bon Appetit “Buckwheat Chocolate Chunk Cookies”
This is great if you want to flex on everyone else’s boring old choc chip cookies by using buckwheat flour (which gives it a subtle, nutty flavour). I also chopped up a bar of Lindt 80% chocolate because it is nice and thin, which created the most amazing pools of melted chocolate. Goodbye chocolate chips.
Overall verdict: they are actually also very easy to make despite the fancy sounding name, although in comparison to the first recipe, you need two egg yolks in addition to a large egg. Use the leftover whites to bulk up scrambled eggs, or freeze them for future use (like meringues or chocolate mousse).
These cookies ooze sophistication, from the buckwheat, to the dark chocolate discs and sprinkle of salt on top. Would recommend, especially if you want something a little less sweet. Definitely still a chewy cookie.
Top tips: Bon Appetit magazine have an online forum where editors and recipe creators answer just about every question you could have about baking in general, and also this recipe specifically.

So there we have it! Three AMAZING chocolate chip cookie recipes, each with its own characteristics. If you are going to force me to choose a favourite, I have to say it would be recipe #1, followed closely by #3. But I will be making (and eating) all of these recipes over and over again.
Two things to look out for if you are going to try the recipes.
- If you don’t have self-raising flour (recipe #1), you can make your own at home. The ratio is 1 tsp baking powder to 150g plain flour.
- If you don’t have unsalted butter (it tends to be more expensive), reduce the amount of salt in the recipe. 100g of butter contains around 1.5g of salt. You’ll need to do some math based on the recipe but nobody likes a cookie that tastes like it’s been dunked in seawater. Do dunk it in milk though.
As always, if you make any of these recipes, please tag me on Instagram @balanceyourplate and DM me any questions and suggestions for future posts!
]]>1. Read Labels & Choose Your Battles
When deciding between brands like store-brand (such as Essentials, Pams, Value) versus name-brand, I always read the ingredients list first. If the cheaper alternative has similar, or perhaps even better nutrition contents, I will obviously go for the cheaper option.
It is a common misconception that cheaper brands fill their products with additives, sugar, salt etc. It’s not always the case and unlikely for products with only a few ingredients to begin with (like milk).
There is little difference between the ingredients in the cheaper store-brand versus name brand
In other instances, I choose to pay for a premium.
When to buy premium
While a $1 loaf of bread sounds good budget wise, I would argue that buying a loaf that costs a couple of dollars extra but contains twice as much fibre(which keeps you fuller for longer), as well as more whole grains and seeds is worth it.
If you drink non-dairy milk, I would also recommend looking at the ingredients and nutrition information panel because the amount of calcium and other fortified nutrients can vary between brands and price-ranges.
Personal preference obviously plays a huge part in your buying decisions. If you simply cannot give up the fancy $6 jar of peanut butter, then look elsewhere in your shopping trolley to make those savings.
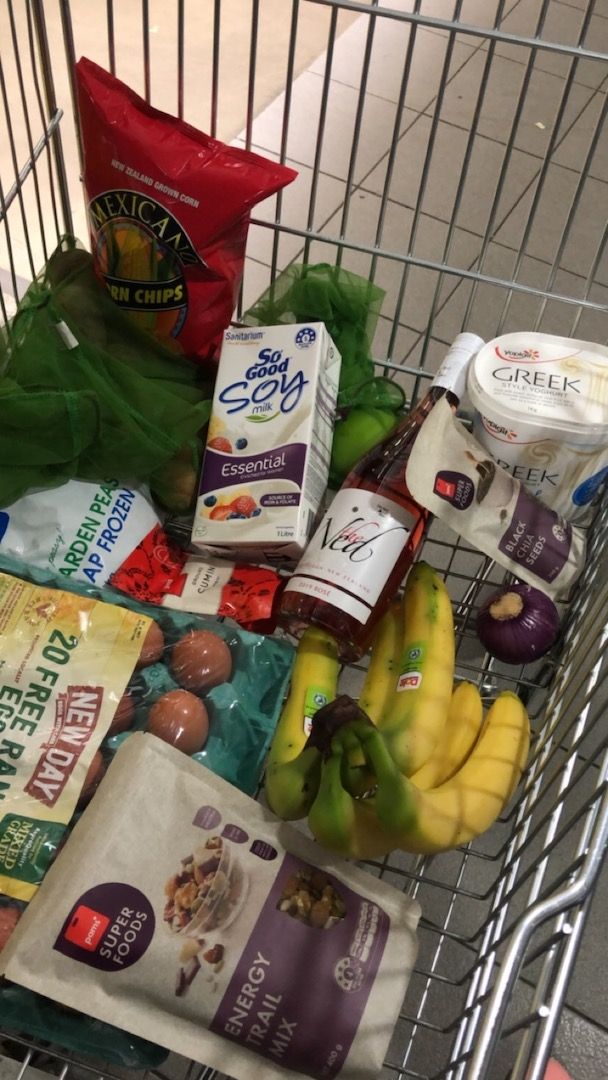
2. Think Fruit & Veggies Are Expensive? Think Again.
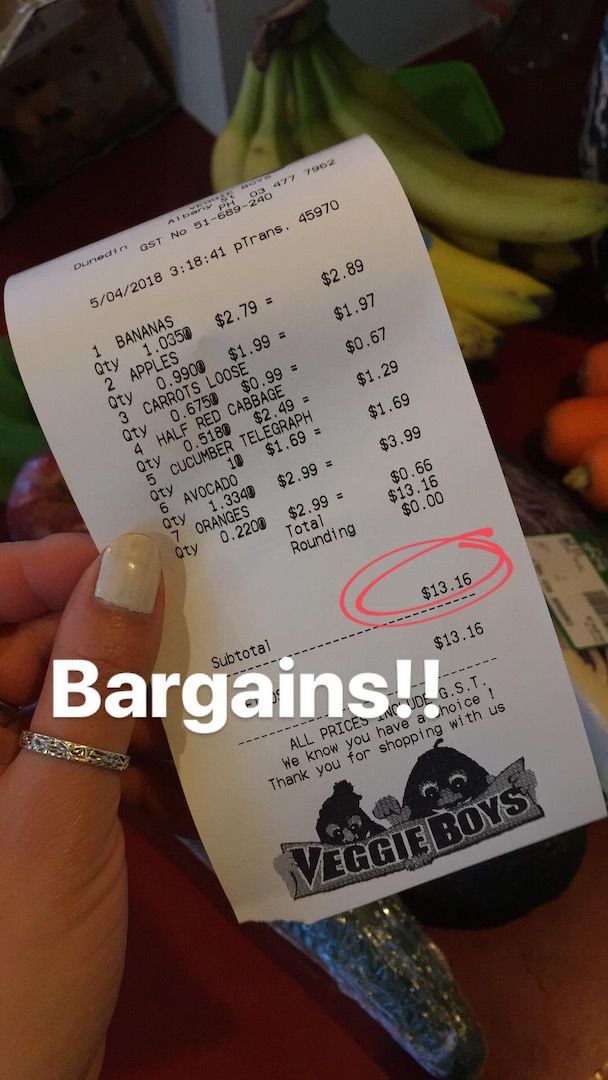
This is more than enough fresh produce to last me a week!
Bananas cost $3 a kilogram. A bag of the cheapest potato chips costs $1.00 per 100g. So that’s $10 a kilogram. Tim Tams? At $3.50 for a 175g packet, I could buy enough bananas to last me a week. I don’t know about you but I could polish off a tray of Tim Tams (that’s 9 biscuits to be exact), pretty damn quickly.
The point is, keep snack foods like biscuits and potato chips for a treat, rather than a regular item on your grocery list. It’s good for your wallet, and your health.
TIP:
- Cheaper fresh fruit and veg can usually be found at Asian grocery stores, and the Countdown Odd Bunch range is also great!
3. Frozen Veg = New BFF
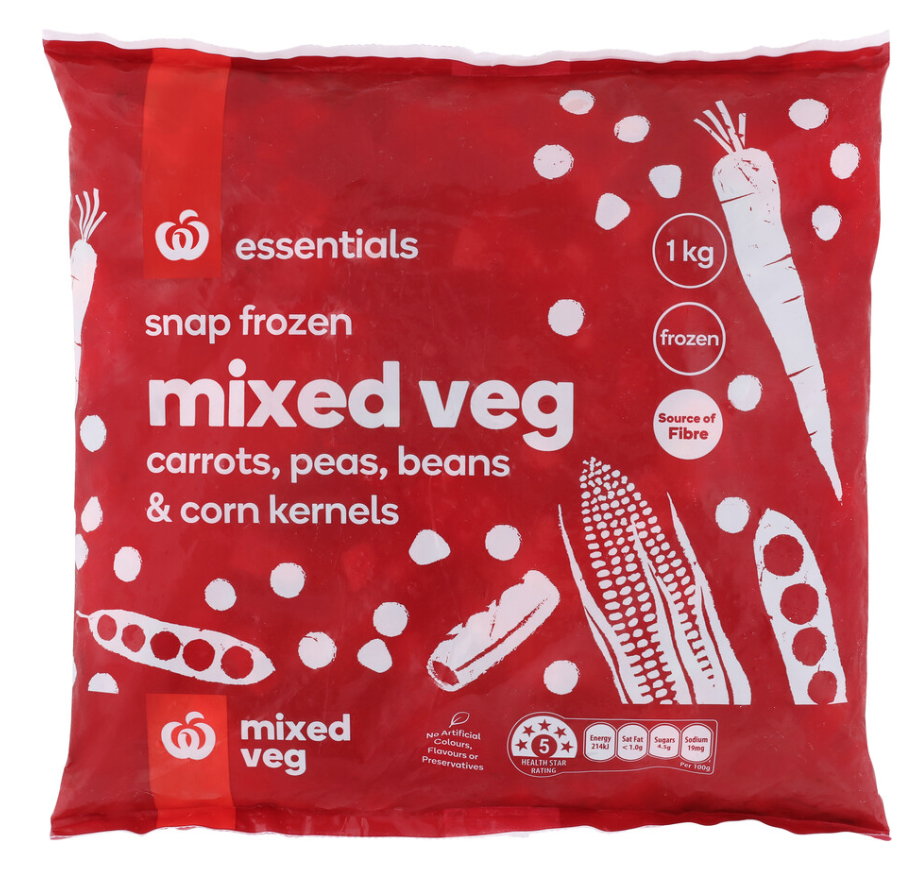
It wouldn’t be a budget grocery shop without a bag of frozen veggie trio right? Well, a huge part of eating healthy is to have a variety of foods and colours in your diet, so the humble carrot-pea-corn combo is doing just that. Half a cup is equivalent to one serving size of vegetables – you are aiming for three serves a day!
Frozen fruit and vegetables retain a lot of their nutrients because they are picked at peak ripeness and snap frozen. One down side to some frozen produce is the change in texture and flavour, but it all depends on what you’re using it for. Smoothies, baking, soups, curries and stews are all good times to use frozen!
4. Eat More Pulses & Less Meat
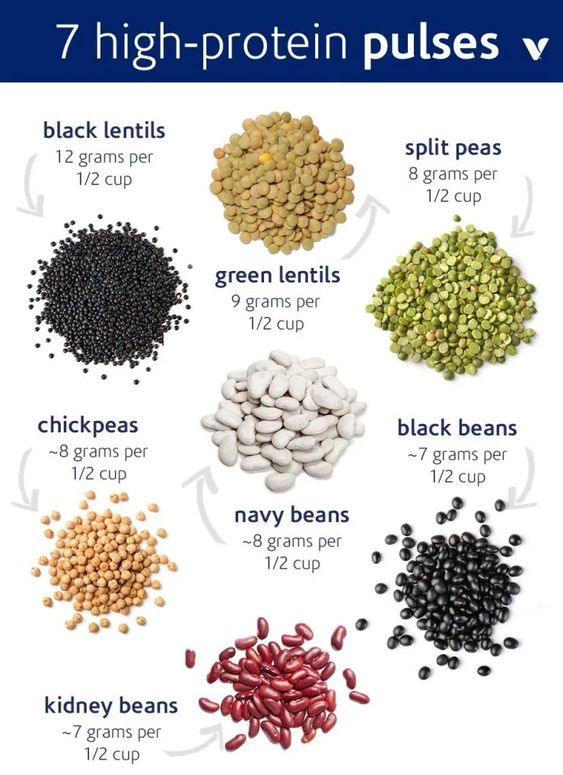
Is your fave flat meal Spaghetti Bolognese? How about next time, cut the amount of mince you use in half (you can freeze it for another time), and add in a cup of lentils? There is no doubt that beans and lentils are much cheaper than meat, and they are still a great protein source.
TIPS:
- Opt for dried lentils because they don’t require soaking and are easy to cook.
- Dried beans are a cheaper option but require more prep time, usually a soak of 45 minutes is required. I prefer canned beans for the convenience (no soaking needed), but an easy solution for dried beans is to start soaking them the night before in the fridge.
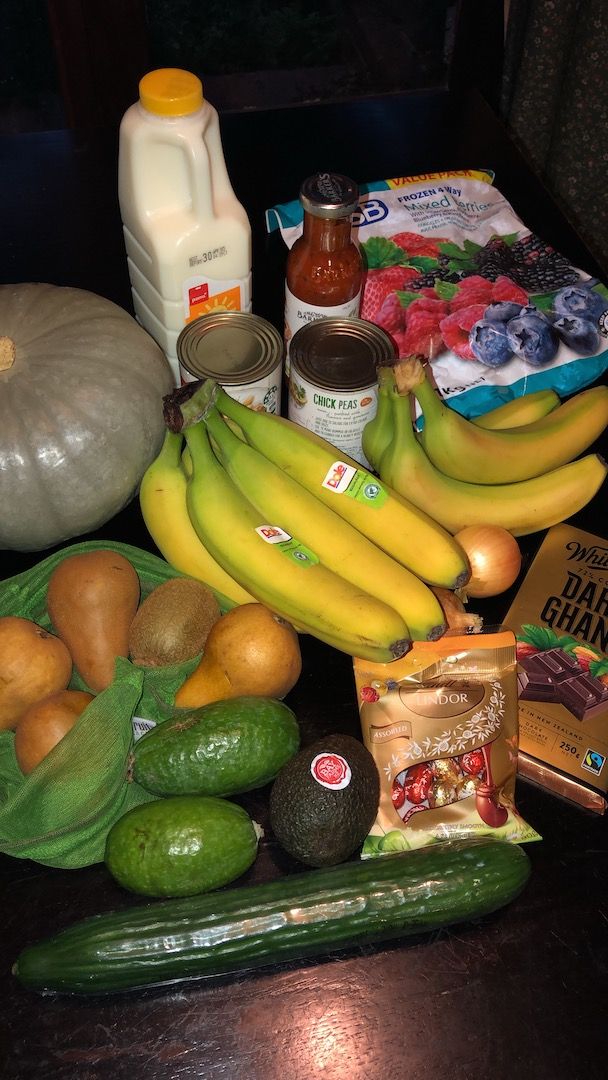
And finally, here are my favourite budget-friendly items to add to my trolley…
TIP:
- A great site for looking at what’s in season is through 5aday here.
And a sample of a few grocery shops in Dunedin
Hope you guys enjoyed this blog post, and found a few useful tips for how to save money next time you’re at the supermarket! Small amounts add up, so don’t look down on saving a few cents here and there.
You can find me on Instagram for more healthy food ideas and recipes! Catch you next time!
]]>Perhaps you’re preparing for flatting life, and need a bit of inspiration for meal ideas without the luxury of your parent’s well-stocked kitchen. Or maybe you just need an easy, and delicious meal to get you back into the swing of things.
Trust me when I say healthy food can in fact be tasty, straightforward to make and affordable! One of my top tips for eating well on a student budget is to bulk out your meals with vegetables (frozen is great) and legumes (like lentils and beans). These foods are high in fibre, which keeps you fuller for longer, and plant proteins are cheaper to buy than meat.
The following recipes are all examples of how you can pack more veggies into your meals while keeping the grocery costs low!
Easy Vegetable Frittata
Perfect for a hearty make-ahead breakfast, or light lunch or dinner. And it only costs $1.25 per serve!
Ingredients (serves 4)
4 large eggs
1/2 large onion, thinly sliced
1/2 capsicum, thinly sliced
1 potato, diced
1 large carrot, grated
1 C corn kernels (frozen is fine)
1/4 C milk
1 tbsp flour
1 tsp mustard
Vegetable oil
Salt (approx. 1/2 tsp)
Pepper and chilli flakes to taste
Instructions
- Preheat oven to 180C.
- Cook potato in the microwave for 5-6 minutes on high, and cook the corn kernels if using frozen.
- Heat a drizzle of oil in a pan, and cook the onion and capsicum until soft. Then mix in the carrot, corn and potatoes.
- Beat eggs with milk, flour, mustard, salt, pepper and chilli flakes.
- If your pan is oven-safe (such as cast-iron), pour the egg mixture over top of the vegetables. Otherwise, brush a baking dish generously with oil and transfer the veggies and egg into the dish.
- Bake for 25-35 minutes, until the egg is just set and golden brown.
Store in the fridge for up to 4 days, and serve chilled, heated or at room temp. I wouldn’t recommend freezing as the texture of the egg changes.
Healthy Kūmara and Brown Lentil Curry
I like to call this the “empty-the-fridge” curry, because you can literally put whatever veggies you have and it will taste great!

Ingredients (serves 4-6)
1 can brown lentils, drained
1 can diced tomatoes
1/2 can light coconut milk
1 large kumara, peeled and diced
1 medium carrot, sliced
1/4 head of small cauliflower, florets and stalks
1/2 large brown onion, sliced
1 heaped tbsp curry powder
1 tsp garam masala
1 tsp fennel seeds
Salt (approx. 1/2 tsp)
Pepper and chilli powder to taste
Instructions
- Place the diced kumara in a microwave safe bowl, and heat on high for 5 minutes; this will shorten the cooking time later.
- Heat a generous drizzle of oil in a large pan, and fry off the onion and spices.
- Add all the vegetables, then pour over the diced tomato and coconut milk. Season, taste and adjust accordingly; you may want to use more spices depending on how strong you want it.
- Simmer on low/medium for 10-15 minutes with the lid on to allow the vegetables to soften.
- Stir lentils into the pan, and simmer without the lid on medium to reduce the sauce. If you like a really thick sauce, mix a spoonful of cornstarch with cold water and add to the pan.
Serve with a handful of cashews, fresh coriander if you have some, Greek yogurt and rice or flatbreads.
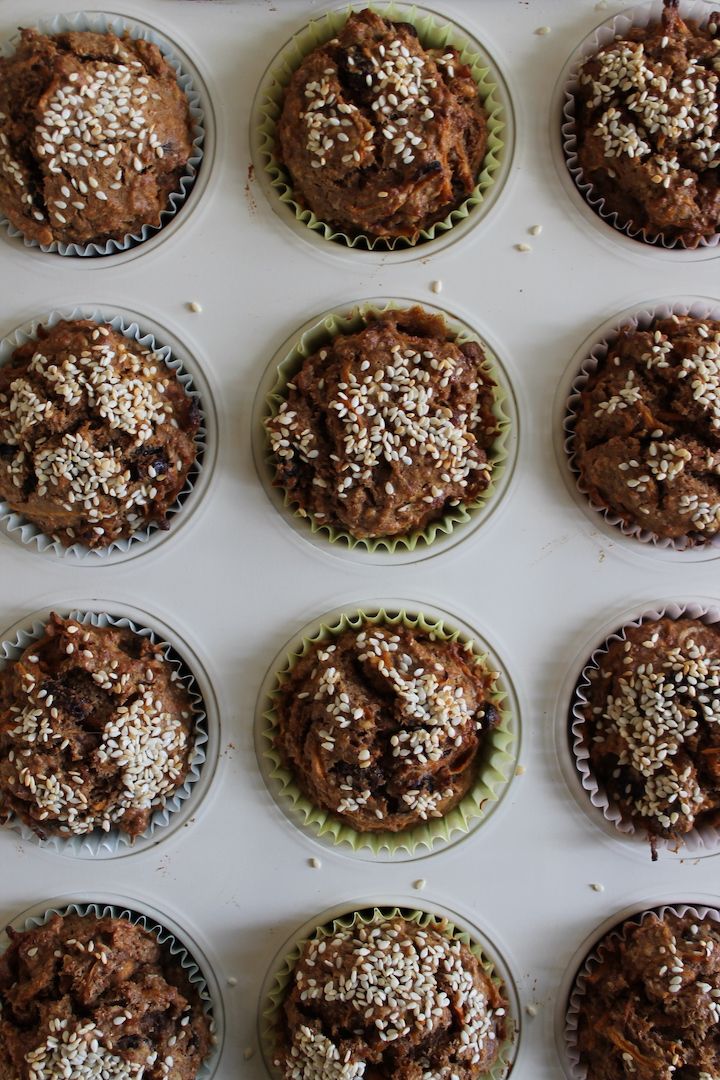
Carrot Cake Muffins
A sweet snack that freezes well, contains veges and doesn’t taste overly healthy? It’s a 10/10 from me.
Ingredients (makes 12 muffins)
1 1/2 C wholemeal flour
1/2 C rolled oats
1/2 C brown sugar
1 tsp baking powder
1 tsp baking soda
1/4 tsp salt
2 tsp cinnamon
2 tsp ginger
1/2 tsp nutmeg
1/2 C raisins (soak for 5 minutes in hot water)
1/2 C chopped walnuts (toasted)
2 C carrots, grated (approx. 2 medium carrots)
1 egg
1/2 C oil
2/3 C milk of choice
1 tsp vanilla extract
Optional: sesame seeds to sprinkle on top
Instructions
- Preheat oven to 180C.
- Combine flour, oats, sugar, baking powder, baking soda, salt and spices in a large bowl.
- Fold in raisins, walnuts and carrots to the flour mixture.
- Whisk together egg, oil, milk and vanilla; fold into dry mixture until everything is well combined.
- Divide the batter between 12 muffin tins; either grease well or use paper liners. Sprinkle with sesame seeds if using.
- Bake for 15-20 minutes until a skewer inserted comes out relatively clean (a few crumbs is fine as you want the muffins to be moist).
Store in an airtight container, or freeze. To defrost, just microwave for 1 minute!
Hope everyone is having a great start to 2020! If you want more healthy recipe inspo, check out my other posts and my instagram @balanceyourplate.
]]>I know December can be tricky for making a last ditch attempt to achieve your long forgotten New Year’s resolution to eat healthy and get fit. BUT remember that abs aren’t formed overnight, so eating your favourite festive foods (in moderation) won’t ruin your #hotgirlsummer/ #hotguysummer plans.
The four tips below aim to help you find a balance between eating to your heart’s content without feeling literally food drunk…
1) HAVE A GAME PLAN

There are so many Christmas foods to choose from… sweet, savoury and everything in between. But we all have our favourites right? Use the Marie Kondo approach to decluttering, except eating the foods which spark joy.
Tip
- Eat the foods you truly enjoy, rather than mindlessly munching on everything in front of you – Go in with a game plan and approach a table laden with food with those favourites in mind.
Why go for mediocrity, when you can choose the best?
2) BRING A HEALTHY PLATE
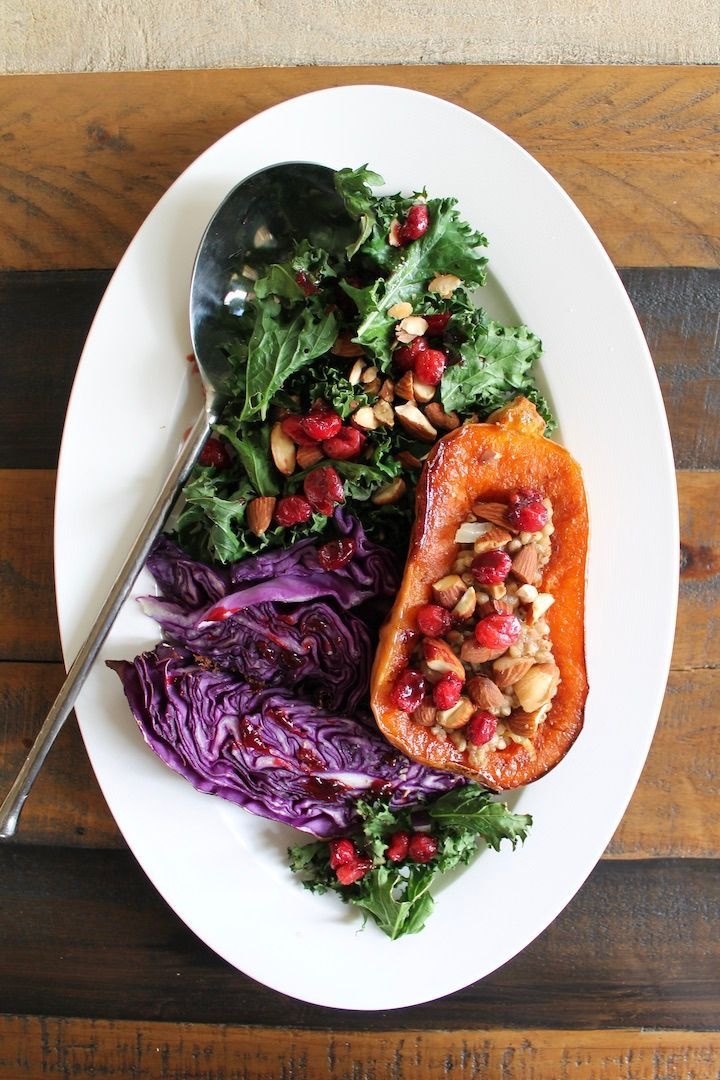
5+ a day is hard to achieve during the holidays. If you’ve got a pot luck dinner, contribute a healthy-ish dish.
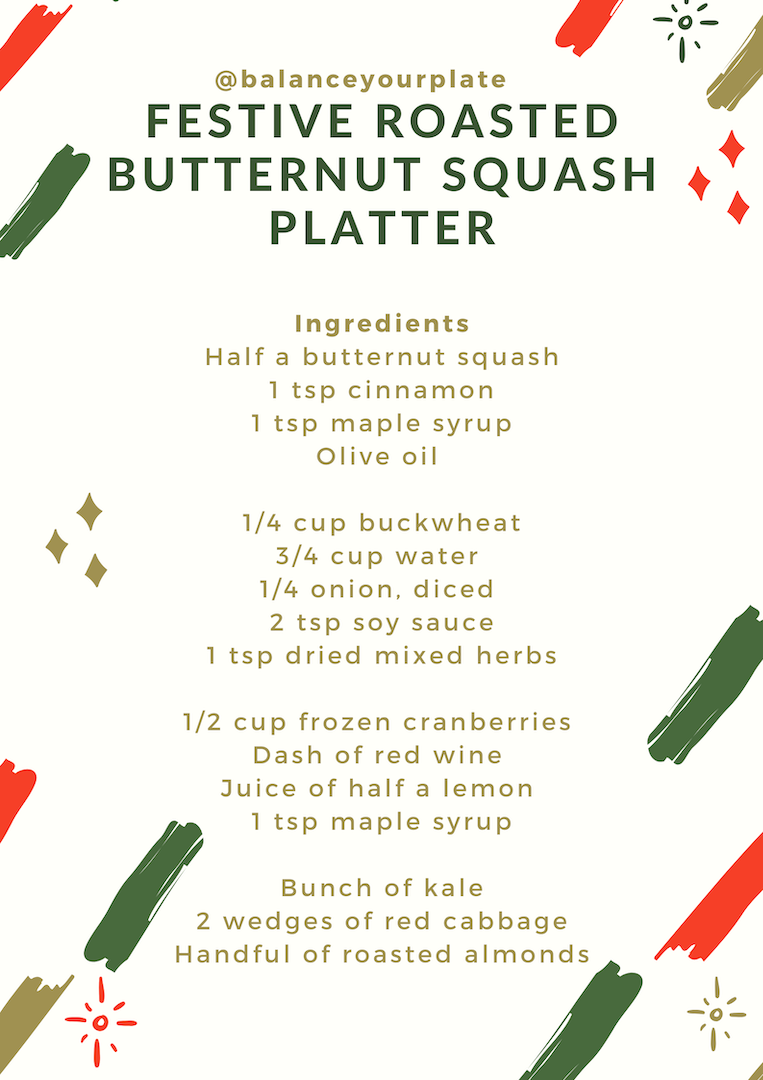
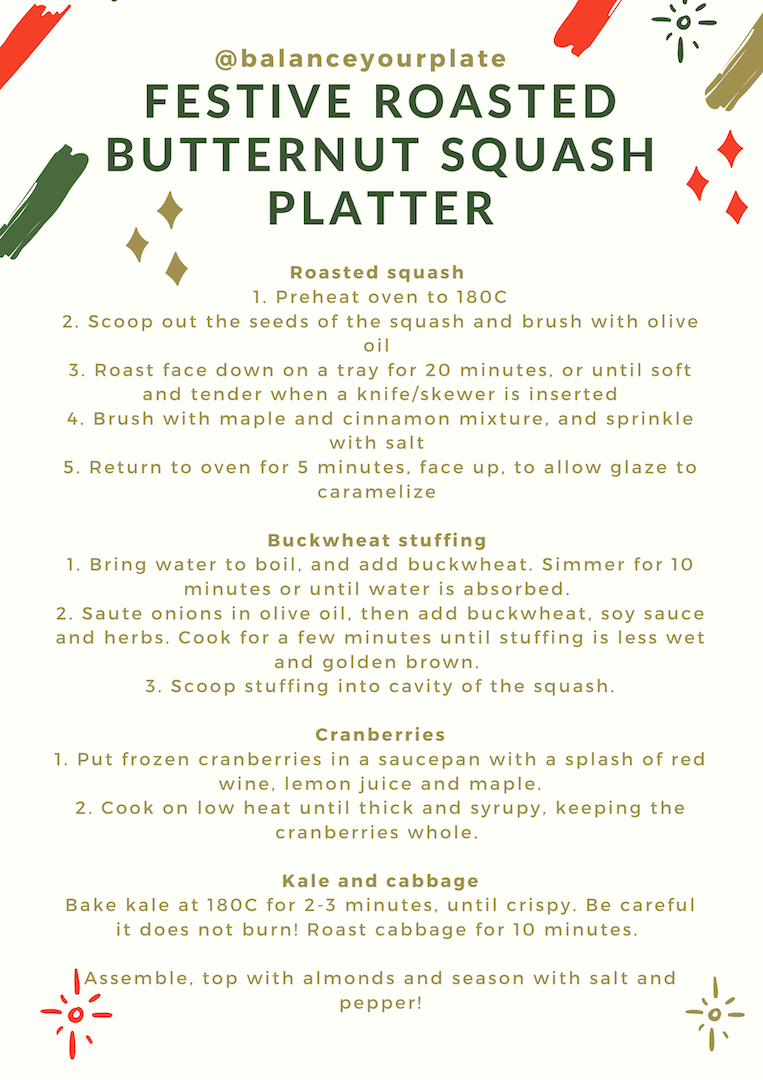
This roasted butternut squash is glazed with maple and cinnamon, and filled with a buckwheat stuffing. It’s vegan and gluten free – perfect for catering to dietary requirements.
Roasted Butternut Squash Recipe
3) ‘TRY’ TO GET MOVING

A summer Christmas means plenty of opportunities to be outdoors. Go join every other New Zealander and their dog (literally) for a walk around the park, or head down to the beach for an afternoon swim.
Tips
- Change your mindset – Move your body with the intention of looking after yourself, rather than to burn off your whole holiday meal. Get your blood pumping to help with digestion and to feel less sluggish.
- Pinterest is a great place to start for free workout routines – If your New Year’s resolution is to get fit, why not get a head start and ease yourself into it now?
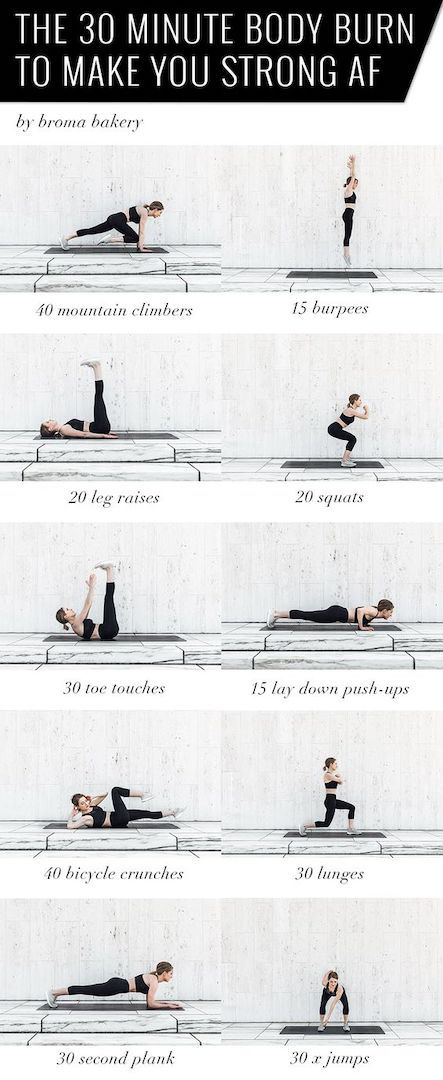
- Small workouts to help achieve small goals – Here are a couple of ideas if you want a quick workout without leaving the house (no equipment required).
4) RELAX AND ENJOY THE HOLIDAYS


Don’t let feelings of guilt ruin the festive season! It is one day, or week, of the year where we have the opportunity to spend lots of time with family and friends, and eat special foods (like a whopping big ol’ turkey or ham, plus all the trimmings).
It’s one thing to be mindful of not overindulging for the sake of Christmas, but it’s another to feel bad about deviating from what is ‘normally’ healthy.
Chill out because you can balance this out in the remaining 300-odd days of the year.
And there we go – the holiday season may seem like an absolute minefield when you’re trying to eat healthy and in moderation. But by being smart, you can still eat the foods you really love!
Happy holidays! As always, feel free to hit me up over on Instagram @balanceyourplate where you can see all the food I am going to be indulging in this Christmas…
]]>The age of grammable food is upon us and the holidays is an opportunity not to be missed. The below guide will help you become a GREAT host by keeping your your guests wined and dined. Or better yet, a star guest who contributes to the platter or drinks fridge!
Platters and Grazing Boards
Platters are an easy way to provide nibbles for your guests. They can be as simple or fancy as you want, and there is little to no cooking involved which makes prep super easy!
Just gather your ingredients, lay them out and boom, food sorted.
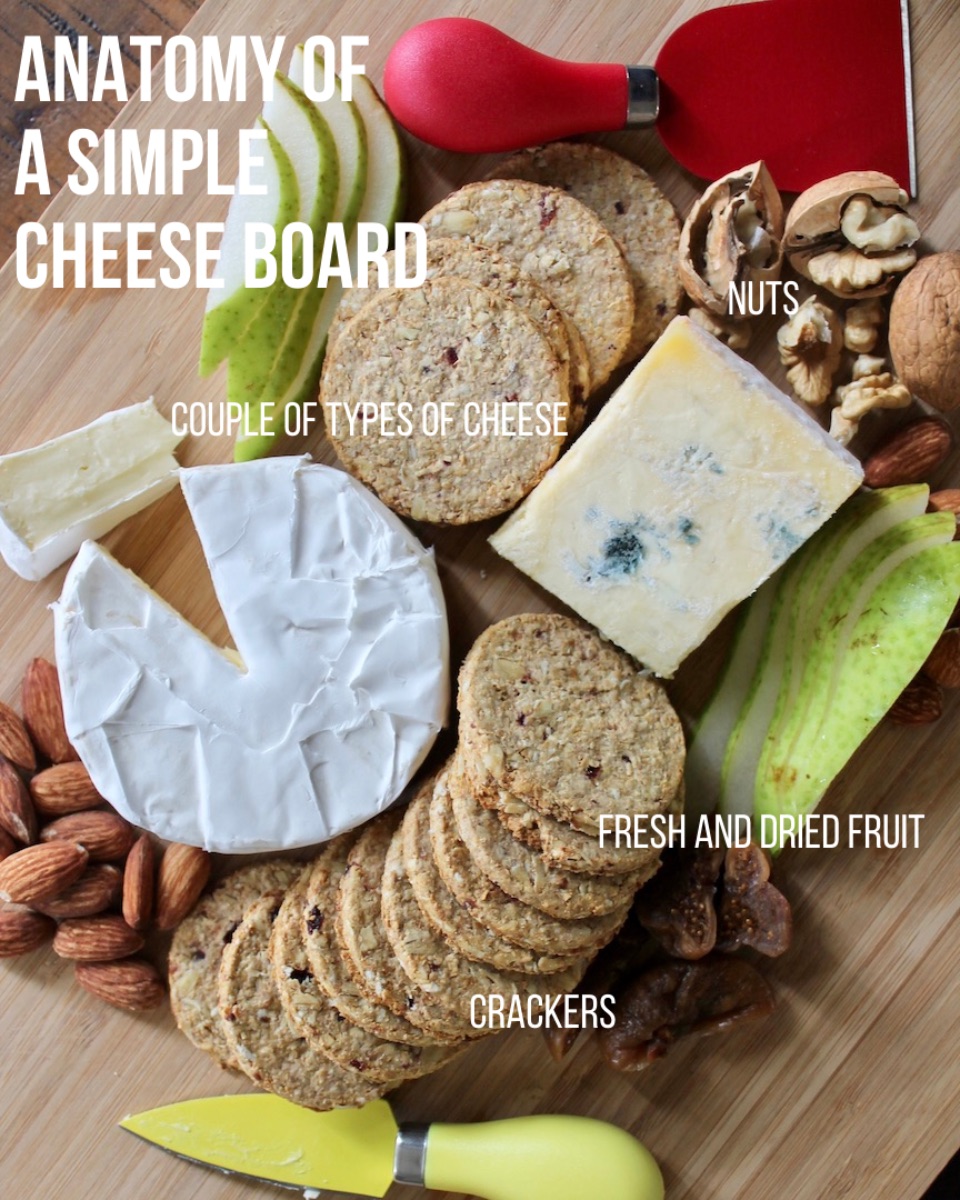
A Degustation Guide
1) Cheese – my go-to combo is one soft (like Camembert or Brie), one hard (like a smoked cheddar or gouda) and one funky (blue cheese… I’m looking at you). For a sweeter twist, find a wheel of cream cheese filled with nuts and dried fruit!
Tip: It’s always a good idea to buy an additional wheel of Camembert for a bigger group, it’s a popular choice and always goes first.
2) Crackers and bread – it’s not a platter without some carb-y goodness. The thin wafer crackers are great (and far superior to plain water crackers IMO), and so are oat crackers which are buttery and great on their own. You can never have too much bread and crackers in my experience… the more people drink, the faster the crackers go (regardless if there is cheese left or not).

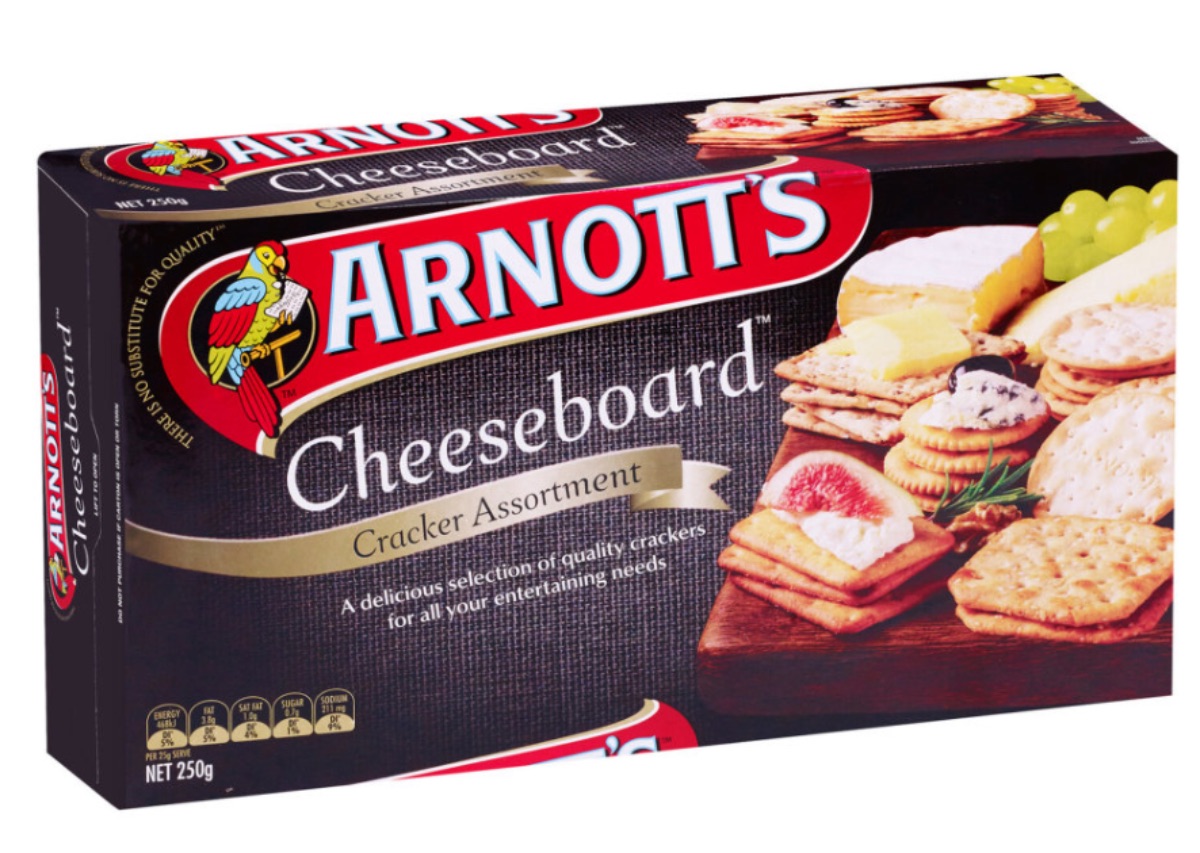
Tip: to cater for smaller groups, look for the special ‘cheese-board’ selections to get you a great variety on your platter without buying lots of different products.
3) Meat – some pâté, salami or prosciutto never hurts on a platter (unless all your guests are vego). However, they can be pretty pricey so if your budget is limited I would say this is an optional extra.
4) Dips – hummus and other dips are a great (and affordable) way to bulk out the platter, and it means you can have less cheeses but still feed a crowd. Pop a few handfuls of tortilla chips or bread next to the dips.
Other extras – grapes, sliced apple and pear, nuts and fruit paste or preserves are all wonderful additions to a platter. You don’t need a lot of these extras, because a little goes a long way into elevating your grazing board to the next level!
Make It Festive
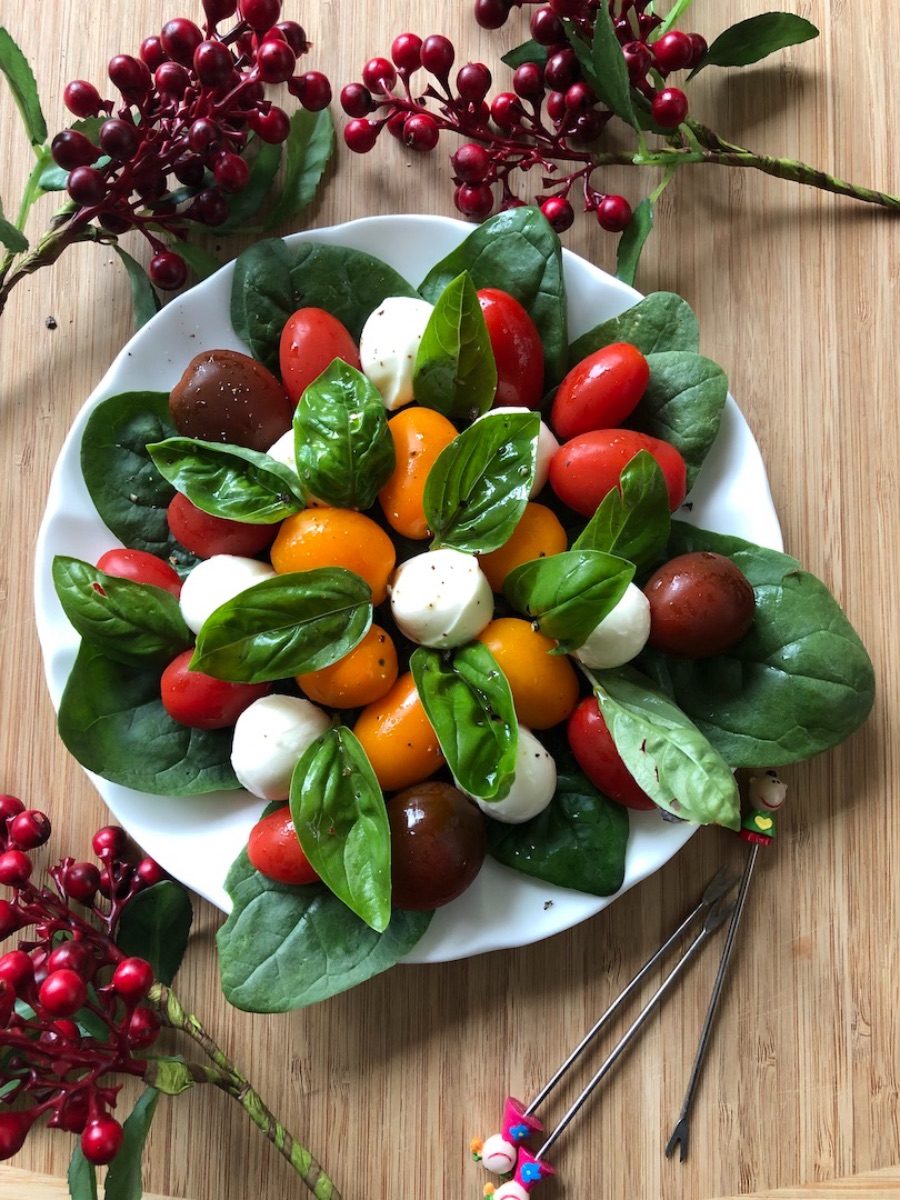
Want to be extra festive? Try this wreath made of cherry tomatoes, mozzarella balls and basil. Or add a few mince pies to your platter!
Drinks
BYO is great, but why not take it an extra step to impress?
Rosé sangria (recipe) or a simple Pimms, soda and lemon
My Top Drink Suggestions
1) Sangria – a great combo of wine, juice and fruit. You will find my favourite recipe for Rosé sangria here.
2) Pimms – Pimms, soda and lemon. An absolute classic!
3) Spirit & Mixer Lab – buy a range of spirits and lay them out with mixers such as lemon lime and bitters, lemonade, tonic water, sliced lemons and plenty of ice!
It’s a great way to ease into drinking, and everyone can summon their inner master mixologist.
4) Prosecco Cranberry Fizz – Give champagne’s far more affordable Italian cousin a festive twist. Top it up with some cranberry juice and pop a few frozen cranberries in each glass to keep your drinks cool and christmasy.
5) Candy Cane Infused Vodka – Nothing screams Christmas more than peppermint candy canes. This simple recipe with Vanilla Vodka, will be sure to impress.
Healthier Drink Options
1) Spirit Sodas – Mix spirits with soda water and a squeeze of lemon for the cheapest option.
2) Low Sugar RTD’s – If you’re looking for a ‘healthier’ alcoholic beverage, my recommendation is to look for drinks low in sugar. This can be tricky since alcohol doesn’t need to have a nutrition information panel, but I think you can guess which ones won’t pass the test (sorry Cruisers).
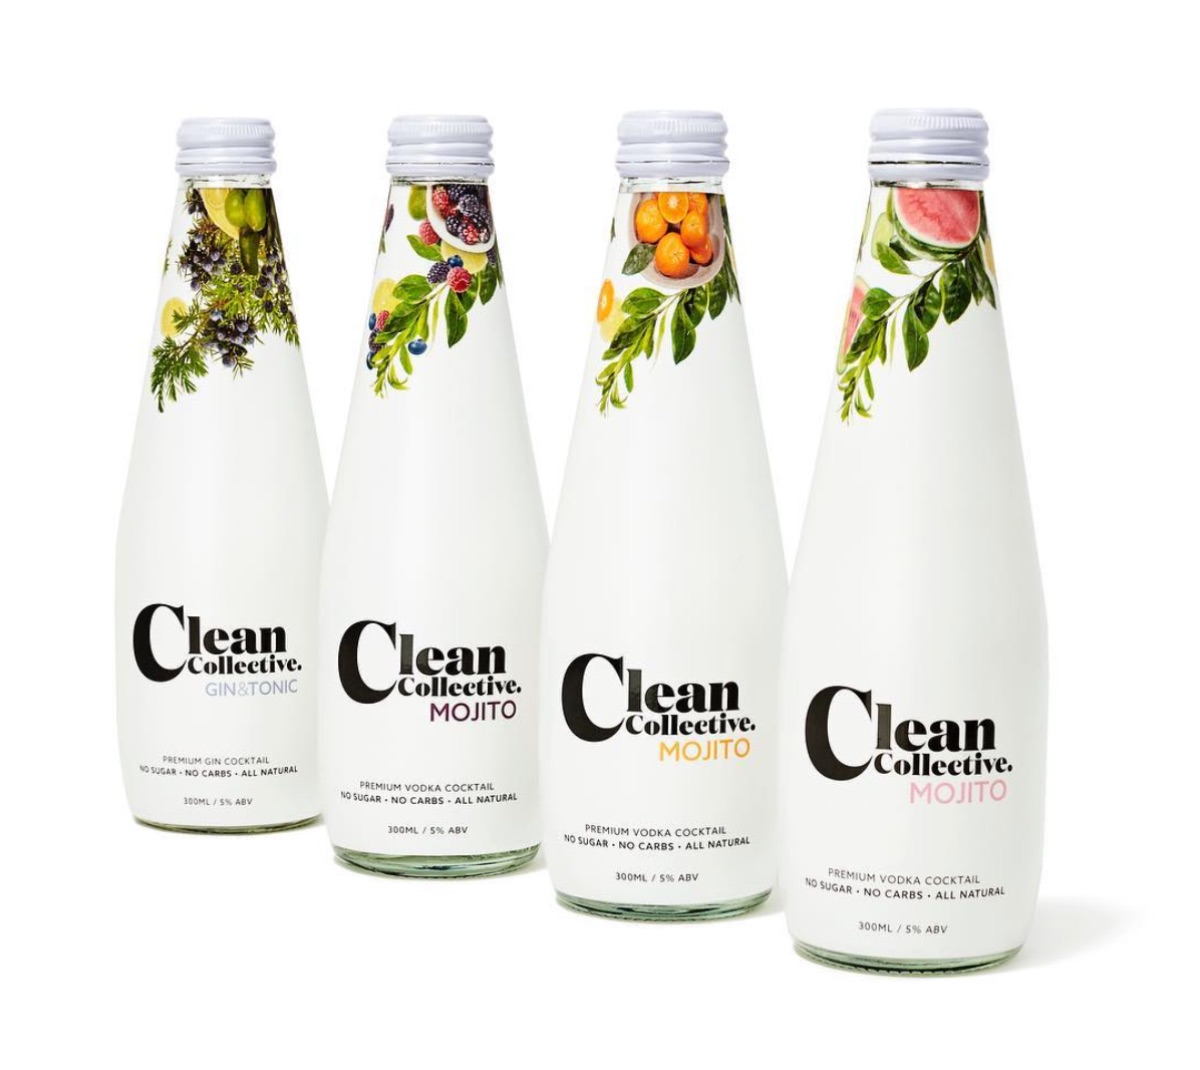
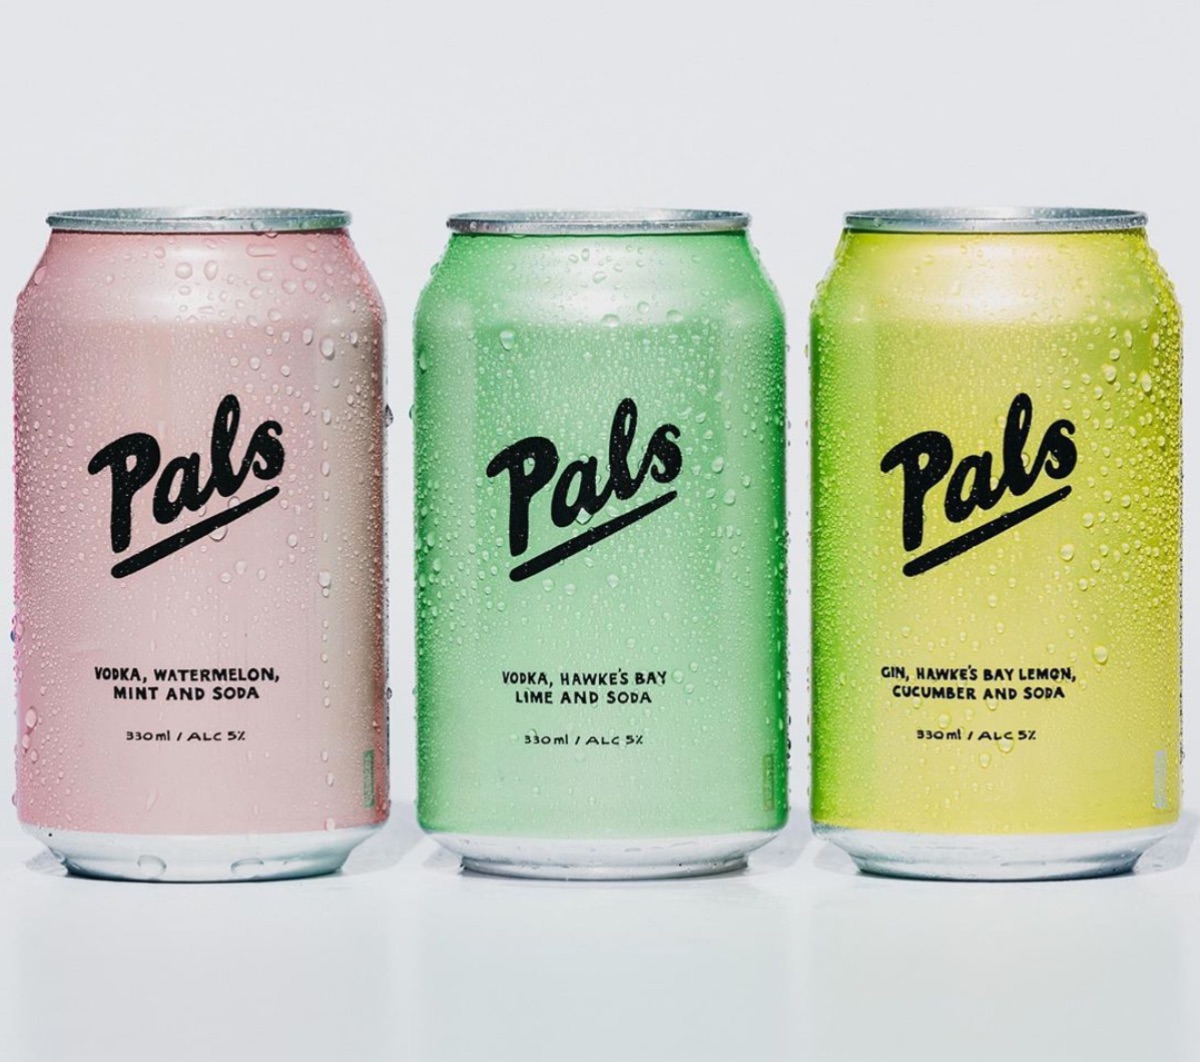
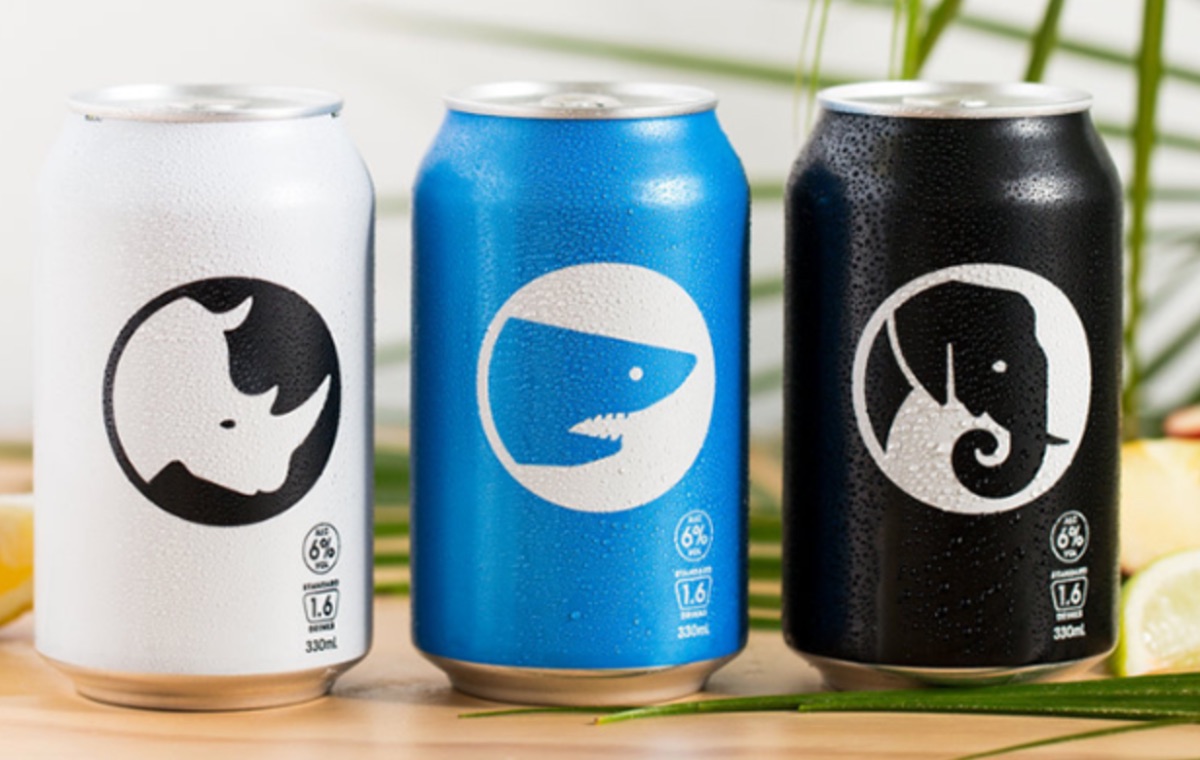
Some low sugar RTDs perfect for the summer
There you go, the two main components of summer entertaining done! Happy holiday entertaining guys, and as always feel free to flick me a message, or tag me in your recreations @balanceyourplate xx
]]>Freedom from the library is on the horizon, so in your downtime (*cough* procrastination time), it’s time to start thinking about what you’ll do with all your free time!
1. Day Trip
Escape the big smoke for a day – there are plenty of places which are an hour out of the central city but offer a breath of fresh air and relaxation.
Kumeu – wineries galore; make sure you have a designated driver!

The Hunting Lodge; approx. 30 minutes from the CBD
Muriwai – have a beach day, and catch the spectacular gannet colony.


I am no professional photographer, but how gorgeous is this view?
Matakana Village Market – foodie heaven and lots of local produce.


More info here; approx. 1 hour from the CBD
2. Have A Drink (or seven)


Saint Alice, La Zeppa and Emerson’s
Of course this had to make the list, what better way to celebrate the end of exams than with a drink! It’s a great way to celebrate before everyone heads off for the summer (or let’s be honest, before toiling away at a summer job).Check out this post from last month about the best happy hour deals in Auckland!
Under $20pp – DIY Cocktail Night


DIY tropical cocktails
Another cost effective way to start off your night is to mix your own cocktails!
I had this at a party in Dunedin and it was 10/10 (not to mention a rad shade of blue). It sounds fancy, but if you split the cost between friends it is still cheaper than one $20 cocktail.
All you need is equal parts white rum and Blue Curaçao, topped with pineapple juice and a dash of coconut cream! Pop in a paper umbrella and boom, a super summery drink which is also classy af.
3. Try A New Recipe
Get in the kitchen and play around.
Top of my list is a recipe for the most gooey, chunky cookies of ALL TIME. If you’ve heard of the Levain Bakery cookies, then this is the replica recipe. I ate those cookies back in 2014 in NYC, and I still think about them till this day…


Recipe and video tutorial here by @theannaedit
Otherwise, websites like Bon Appetit (my personal fave), Ottolenghi (author of Simple) and Food52 have great recipes to browse without needing to dish out money for an actual cookbook.
4. Treat Yourself With A Nice Meal


If you’re living off coffee and snacks instead of meals throughout exam season… the most appropriate thing is to treat yourself to a nice meal! My top tip is to book through First Table and get yourself 50% off the bill at some swanky restaurants around Auckland. Otherwise check out this blog for our self ranked 10 best dinner deals!
5. Life Admin
Okay hear me out because I know this sounds pretty boring, but after my last exam I love to take half a day to tick off all the odd jobs that were kicked off the priority list during exams. Tidy your room, chuck away random bits of paper and notes, reply to emails, do laundry – you get the gist. Afterwards, you can truly relax and start doing all the fun things you just read about!
Regardless of how you thought exams went, you still deserve to celebrate getting through another tough year at uni! Grind now and study hard, but know that freedom is just around the corner.
Good luck to everyone doing exams at the moment! If you have any recommendations to add, chuck a comment down below or DM me @balanceyourplate xx
]]>